

.webp)
Figma is one of the best tools for designers, but converting Figma to webflow can be tricky.
This blog post will share a detailed guide on easily converting your designs to webflow in no time.
Converting a design from Figma to Webflow to create a website is common among many developers.
Figma is a collaborative interface design and prototyping tool for digital projects. It's a cloud-based design tool so that users can collaborate on projects and work pretty much anywhere.
Even though this tool is similar to other prototyping options, it has a key differentiator: it allows teams to collaborate on projects. Figma is one of the best prototyping tools available to date.
It was launched in 2016 and has gained popularity since then.
It runs on both Macs and PCs running Windows, Linux, and even Chromebooks. Plus, it is free and offers a web API.
Webflow is a visual website builder that does not require coding skills. In addition to being a web design tool, it is also a CMS and hosting platform. Using Webflow, designers can create professional, custom websites in a completely visual manner. You get the best of both worlds. You get the benefits of using a visual editor with the flexibility of building a custom website from scratch.
Webflow and Figma both have excellent design tools, with the additional benefit of web publishing via Webflow using your Figma design.
Despite the static design in Figma, you can add interaction and animations in Webflow before publishing.
A site designed in Figma and built-in Webflow will rarely be the same. But that doesn't mean you can't bring the Figma design to life.
Figma is a popular choice among Webflow developers to design their sites before building them, so the translation from Figma to Webflow must be done correctly.
This blog post shows you how to export your Figma designs to Webflow. It also explains how to import your Webflow projects back into Figma.
What you need to get Started
Here are the two major things you need to get started with your conversion;
- Access to Figma design files you want to convert to webflow design
- A Webflow account to import your Figma designs.
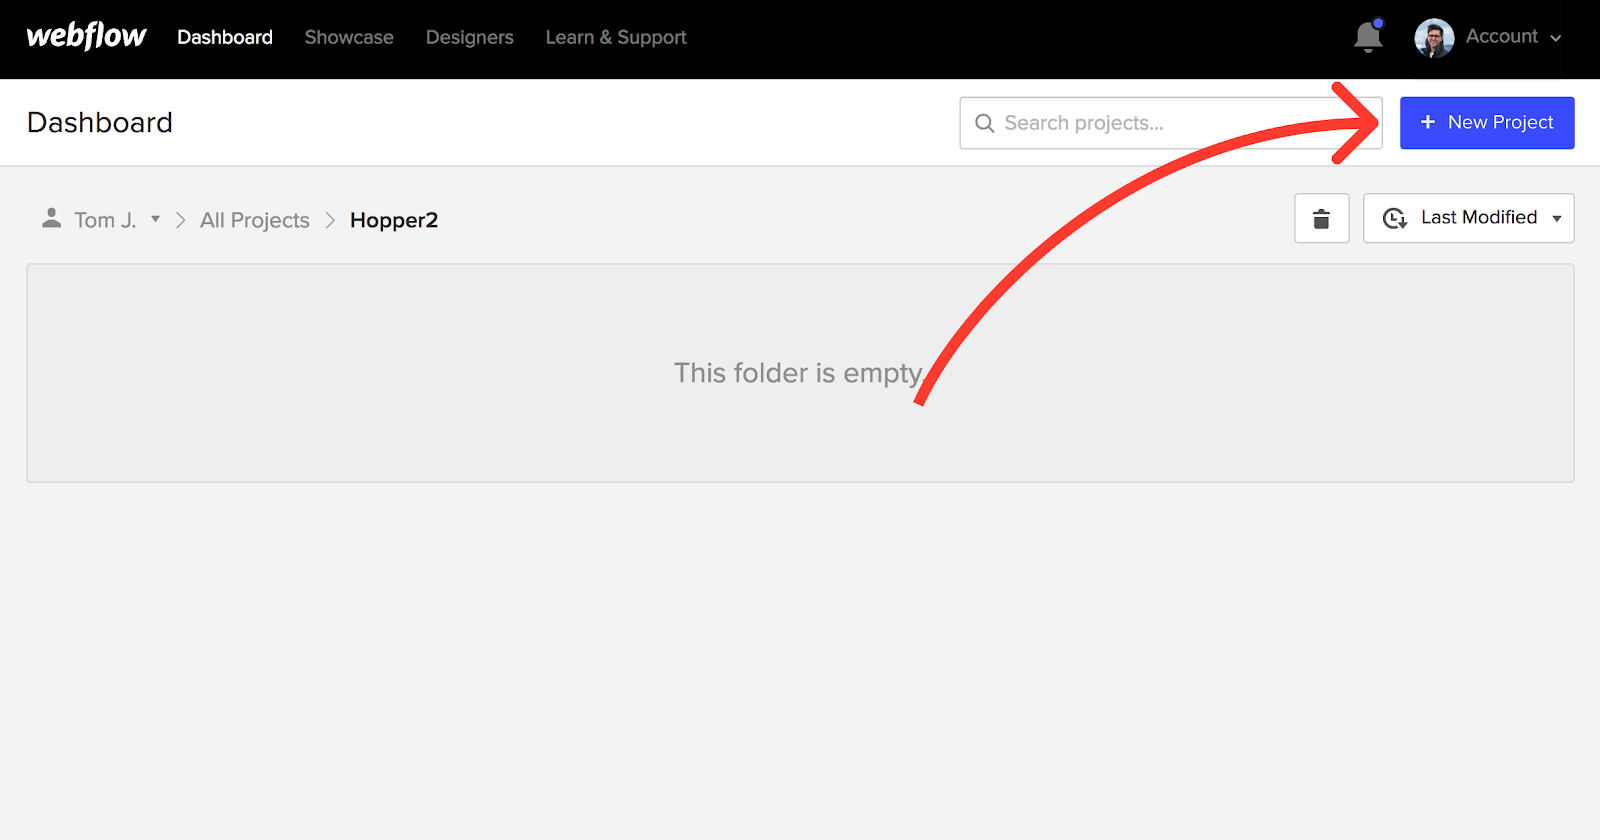
Step 1: Create a Project
Go to Webflow and click on "New Project" by clicking the blue button in the top right corner, and start from scratch. Then build a separate directory for this website project.
The folder and subfolder structure are consistent with how Figma organizes its projects. Therefore, this is also how the file will be exported, so it's an important consideration.
Unless you already have a style guide defined for your Figma project, this step is not necessary. In this article, we will assume that it does not.
Copy or clone the style guide here and paste it on a new page in your project folder.
It's possible to do it even if you're using a Webflow template.
Step 2: Styleguide
It would help if you created a style guide that contains global classes to maintain consistency of headings, colours, and spacing throughout the site.
The global styles include all the standard elements that every website needs.
It is recommended that this HTML tags template should be copied and pasted into my sites as the starting point of your style guide.
You can do that by cloning the site above.
You will be taken to the canvas of that project, from where you can copy over the elements to the new site you just created.
It is also possible to build on top of the template, but you can always start from scratch.
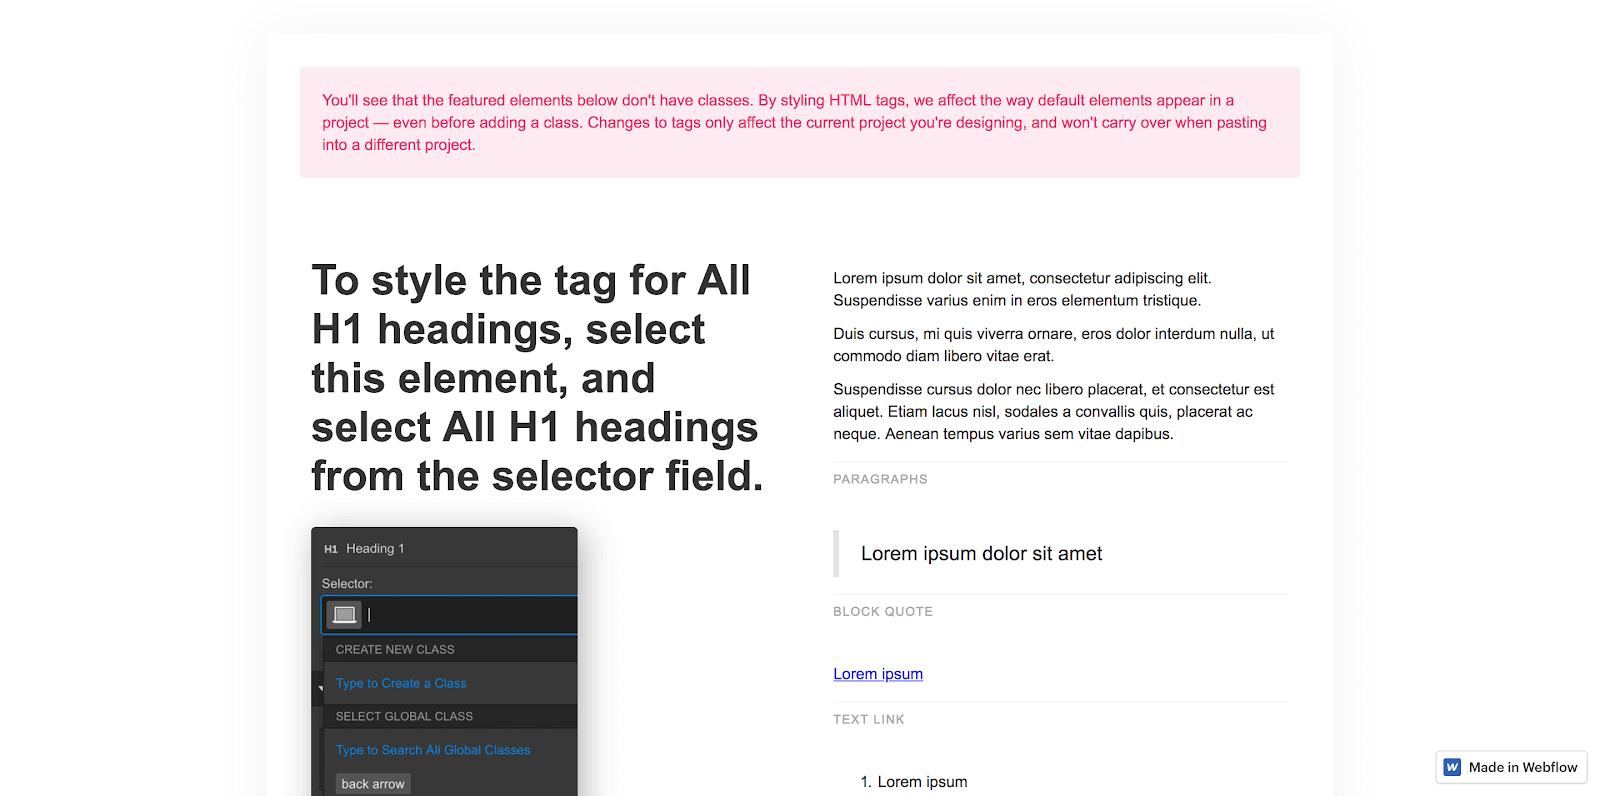
You can define the global style by selecting an element on the canvas and clicking on the class selector field in the top right corner of the screen.
There will be a purple-ish option with "All" in the tag name if the element you've selected can be defined globally.
You must use the HTML tags template above to ensure that the global style definitions match the materials in your Figma design files.
This simplifies the process and keeps your stylesheet light.
The next thing you should do is implement all of your specific colours.
It is a fast process if you have only a few colours and time-consuming if the colours are much.
Insert a color-block div and change its color repeatedly until you have all of your swatches in Webflow.
Don't forget to check the "Global" checkbox to render your colors globally.
You'll notice a small triangle in the lower-right corner of the swatch and a request to name it if they are global.
There are many pre-built frameworks out there that you can use;
- Finsweet client-first framework: The Finsweet Client-First styling system is a set of guidelines and strategies that help you develop Webflow websites in a clear, scalable way that users can easily understand. It is designed to be flexible and customizable for any build. There is no set of strict rules for Client-first. Every build is different. Client-first is a thought process that helps us organise a Webflow project by thinking about how and why classes are named.
- Knockout by Edgar Allan is an end-to-end development framework that helps designers and Webflow developers collaborate better. With Knockout, teams have a shared framework to apply, fostering collaboration and reducing the time and effort involved in building quality products. The Knockout framework makes it possible to create animation-specific classes that can be applied to any element on your site. Knockout was designed to provide clients with the easiest way to build and edit anything with minor complexity.
Pro Tip: You will sometimes find that the design won't look right in Webflow, so always make sure you satisfy your designer eye by tweaking the sizing, etc., rather than focusing on being pixel-perfect!
Step 3: Export Assets
We have completed the preparation steps in Webflow to export the Figma assets.
Exporting is easy if you mark everything for export during the design phase.

To export everything, make sure no frame is selected; if you only want a particular frame, make sure the frame that you want is selected.
Hit Command + Shift + E on Mac or Control + Shift + E on Windows to bring up the export dialogue.
Hit Export once again, then locate your exported files in Finder or Explorer, drag and drop on to the Webflow window.
You can also do it from Webflow using the Upload button in the 'assets' panel.
If your Figma layers contain forward slashes, such as icon/back, then Webflow will automatically create new subfolders.
Pro Tip: Create a Google Drive Folder that houses all your assets, with folders for each page to keep things organised and clutter-free.
Step 4: The Build
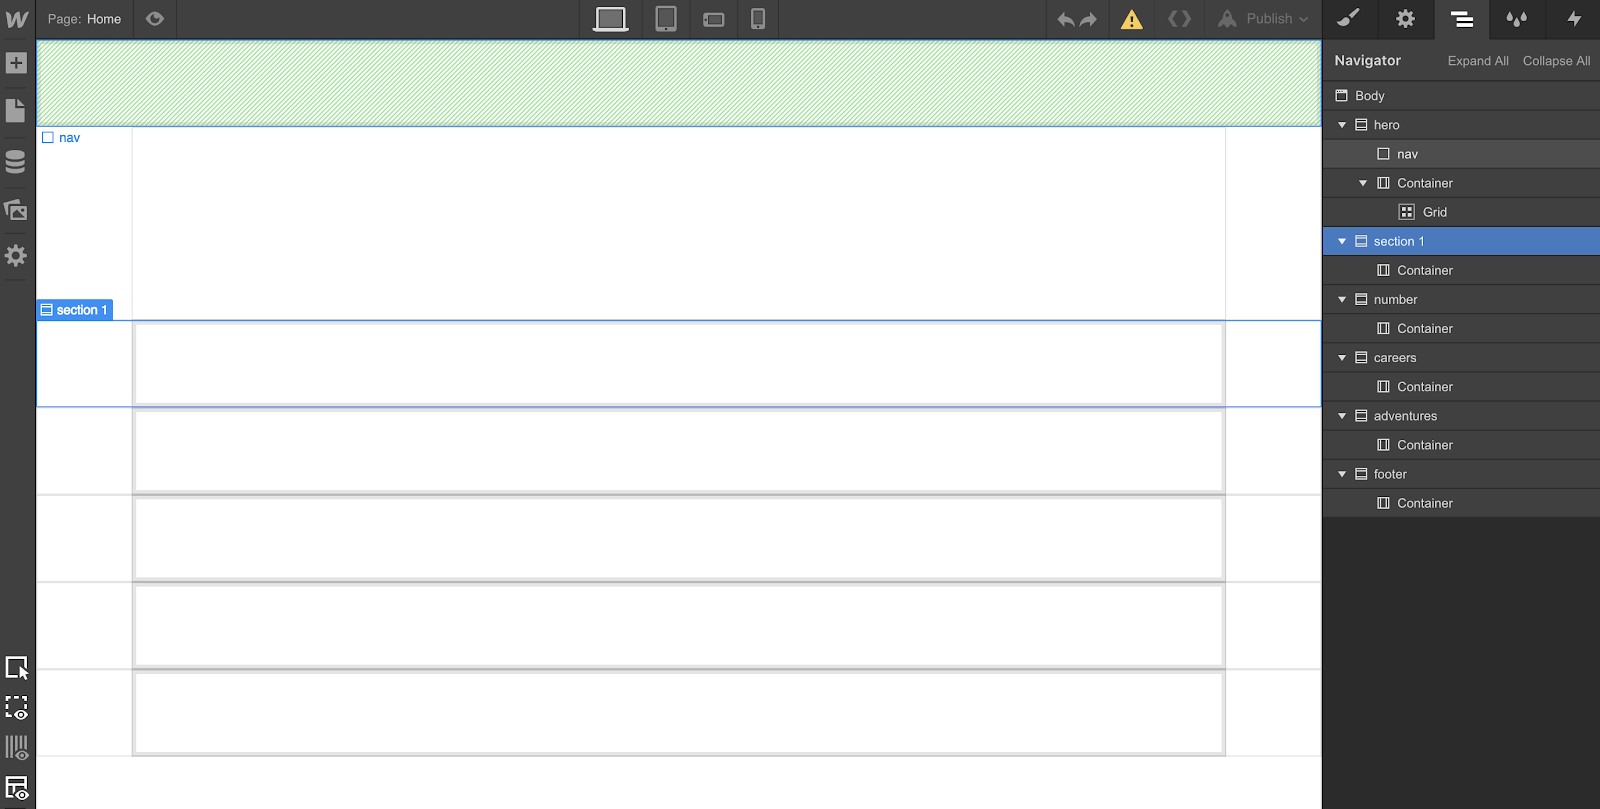
The next step is to organize your website into div-frames.
In other words, you should look at all the large groups/frames from the Figma file and try to replicate them within Webflow using divs.
This step is not necessary, but it will help you stay organized in the long run.
After you have those divs on your canvas, provide them with a specific class name.
It is not necessary to specify these classes for now, but you should go to the settings page and give each an ID.
If you plan to add anchor links to your site, you'll need this later.
You can also use the grid element (or set your div's display property to the grid) on your site if you like.
Another thing you should take note of is "Styling your website."
This is easy to start with but might be challenging to keep things clean with significantly larger sites.
For Instance, Instead of naming something "Black Hero Text," try creating a combo class that is "All H1 Headings" + "Black Text."
It allows your heading 1 class to deal with size, weight and positioning regardless of color. You can add a second class to change the color (or other properties) for your specific use case.
It would be best if you were wary of trying to match your design pixel to pixel. Things behave differently in code than they do in design tools.
Moving an element in Figma is as simple as dragging and dropping. Each element lives in its little world, never affecting others. The web works differently.
Having a Figma Designer who knows the limitations of webflow will help speed things up during the conversion process.
Pro Tip: If you are unsure what size a spacing is, go on the Figma file and use the exact pixels of spacing, and from the Figma file to the Webflow site to make sure it is pixel-perfect!
Step 5: Interactions
Another crucial thing you have to consider is your website interaction.
While Figma can help you with some complex interactions, it can only do so much because everything will be flat.
If you do not have another prototyping tool, you may be limited to using Webflow for interaction design and implementation.
There's no need to worry; Webflow is among the best interaction design tools available.
Therefore, you don't need to create interactions in any other program apart from Webflow.
Webflow interactions are divided into two types:
Some interactions happen per class, such as when you hover over a button or click any element, and
Complex interactions involving multiple classes or elements
For this, the Interactions panel is ideal.
For interactions per class, select the element's state from the dropdown, modify the attribute values, and make sure that the proper transition is implemented when that class updates the property you described.
If, as a Webflow developer, you find it hard to bring your interactions to webflow, make sure to communicate with the client properly to get a clear understanding of what the client wants the interaction to look like.
Perhaps even request a 2D animation if the interaction is complex.
Step 6 - QA/Publish:
The final step is to quality assure your website to make sure everything is working perfectly.
Converting your Figma designs to webflow might seem straightforward, but a lot can go wrong, and you don't want to publish a website that doesn't function correctly.
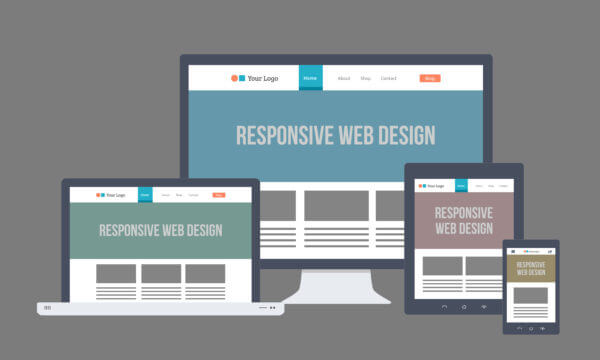
One of the most crucial quality assurance tests is the responsiveness of your website.
You should test your project on as many platforms as possible to preserve the design flow and functionality across all interfaces.
Try to resize your web browser windows as much as possible to see if it breaks.
Utilize an emulator like BrowserStack to render your page on devices and in viewports that you cannot replicate on your own.
Remember that emulators don't always do the best job — the real thing is inevitably better.
It's also essential to have a style guide for your website to clear, recognizable, and recognizable your brand identity.
Getting the style guide right is crucial for maintaining a brand's identity.
Check out this Guide on detailed Steps: Webflow Website Launch Checklist - 8 Things To Check Before Launching Your Webflow Site.
Final Thoughts
Figma and Webflow are both excellent design tools.
They allow teams to collaborate and innovate in different ways.
You'll see the advantages of a team-oriented tool such as Figma right away if you're on one.
The addition of Webflow finally allows you to take control of the process and see your concepts come to life.
As a Webflow developer, converting your Figma designs to a website might be a straightforward task.
It is also super helpful if you are working with a Figma designer who knows the limitations of webflow because they will design the website with the knowledge of what is possible on webflow.
If you need any help with converting your figma designs to webflow, feel free to reach out to us.
We offer Webflow web design services to help business owners increase conversions, sales and much more.
Get in touch with us today and we'll more than happily provide a free video site audit that explains the current state of your website as well as practical tips + resources to improve.
.webp)
Let's talk about your next project.
From highly interactive websites, or micro-sites, to Figma > Webflow development projects, we’ve got you covered - our team of Webflow experts are here to help.


